Essential Equipment for Live Broadcasting
Best Practices from MyVRSpot
Live streaming can feel intimidating because of the various equipment options and the wide range of costs associated with these options. Take a breath, because this article lists and explains the essential pieces of equipment you’ll need to broadcast.
We’ll cover the range of minimalist equipment to professional equipment in the next four sections:
- Video Equipment
- Audio Equipment
- Encoders and Capture Devices and
- Internet Connection
Video Equipment
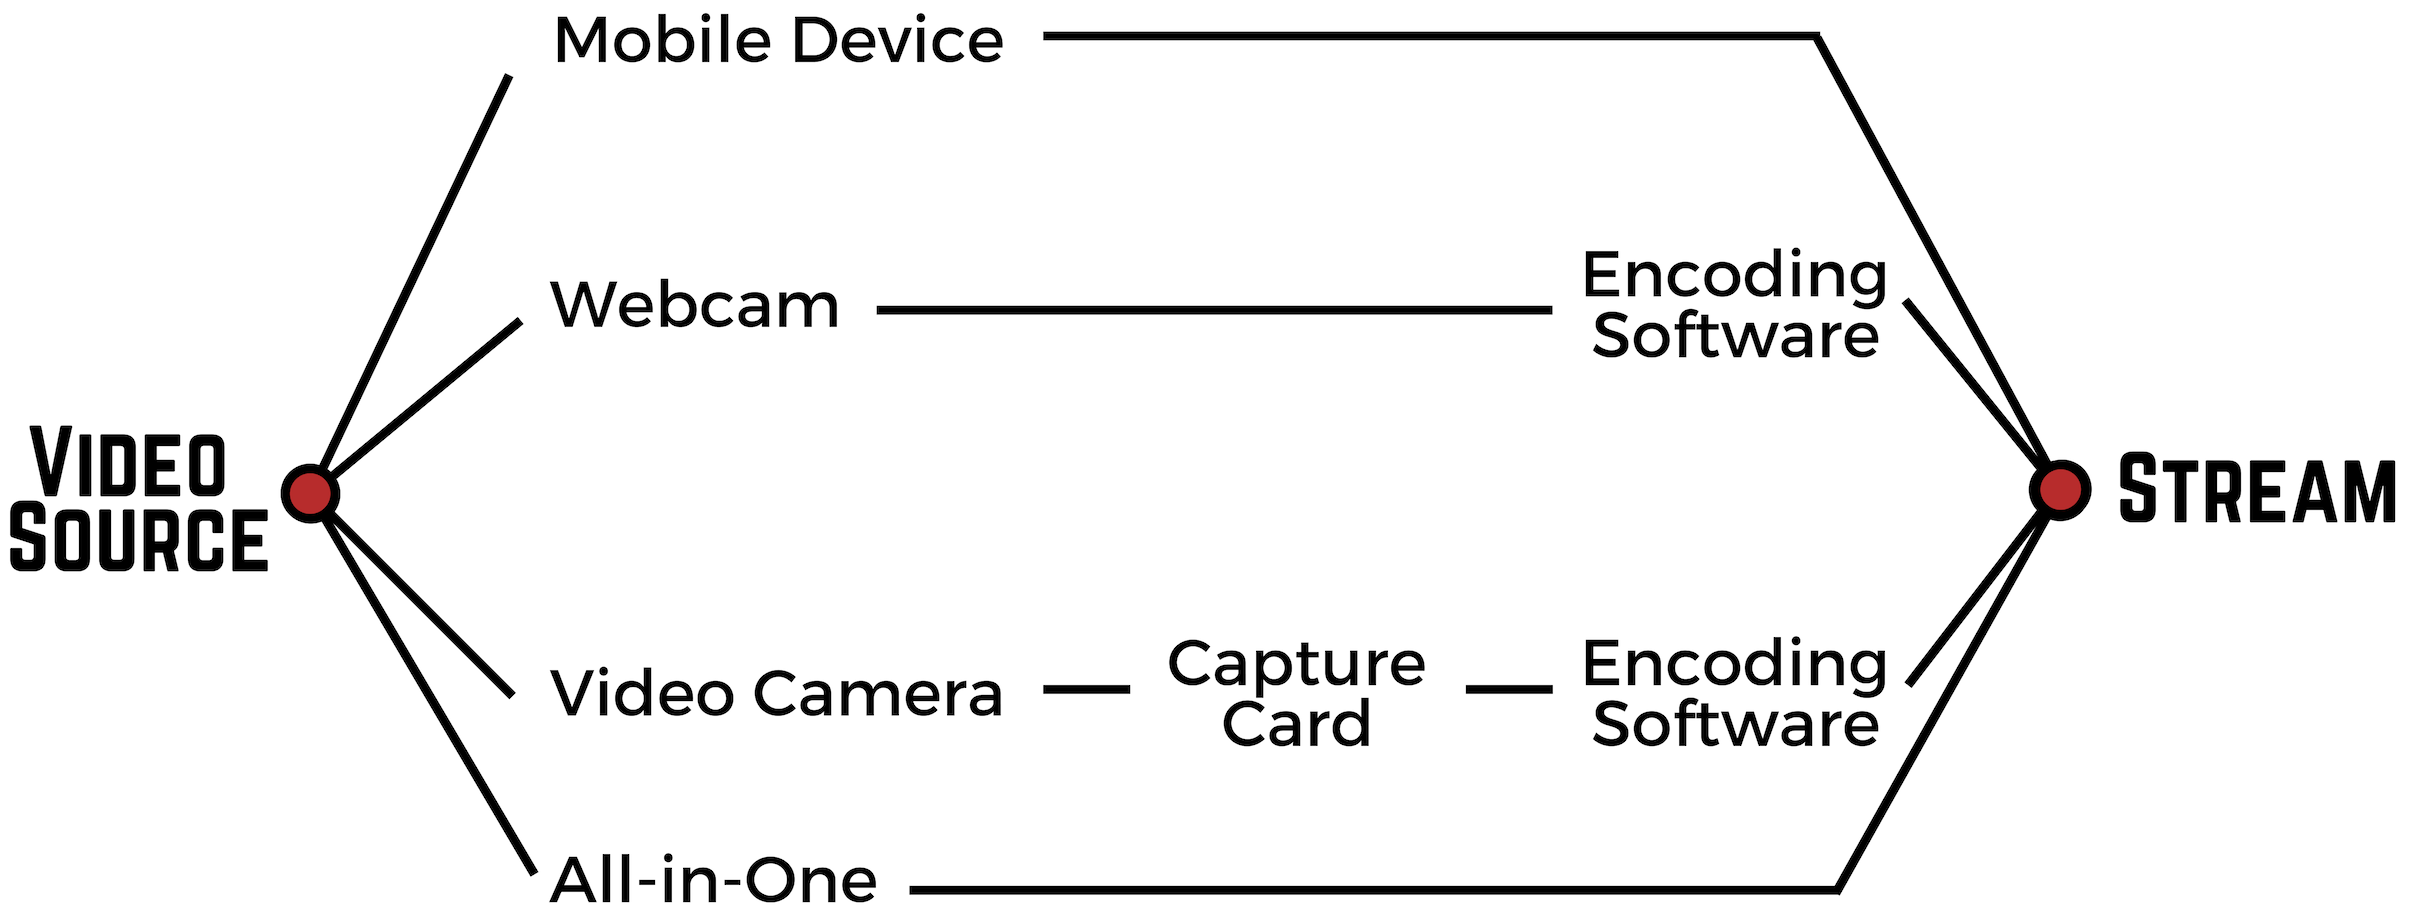
Necessary video equipment, or devices that can broadcast video and audio, may include:
- A smartphone or tablet using a Broadcaster Application for either iOS or Android
- A webcam or
- A digital encoder or recorder
Depending on the content and your intended audience, you’ll want to select the appropriate device for broadcasting. As a general concept, if you plan to use a traditional digital recorder, devices with HDMI connections will produce higher quality streams.
Audio Equipment
If your device is going to be situated more than 15 feet from the activity you are wanting to stream, you will get the best sound quality by using an external microphone. In certain situations, it is fine to use the audio input from your camera, but in many situations, your quality of your audio for your broadcast would be better with an external mic. You can buy a mic for as little as $10. Here are a few audio devices to consider:
- A Bluetooth headset
- A lapel microphone
- A microphone (Bluetooth or wired)
- An audio switcher (basically, connecting your sound system directly into your broadcast)
Now, let’s move onto encoders and capture devices, which you’ll need to transmit the video and audio to your viewers.
Encoders and Capture Devices
Encoding devices can be either software- or hardware-based, and are typically required when streaming from anything other than a mobile device. Encoding means that either the software or hardware intakes a video and converts it into a signal for broadcasting.
The difference between software and hardware is this:
- The software is an application installed on a computer, which intakes a video and encodes it.
- Hardware is an independent device, dedicated to encoding video. The hardware has its own software, computing units, and video capture components inside.
Software Encoders
There are a few things to note if you’re considering using encoding software. If you’re streaming high quality videos, you will need a computer with a powerful processor and an above-average graphics card for a smooth streaming resolution. Otherwise, your viewers will see buffering or frame loss, or worse, your computer could freeze or even crash.
Additionally, you’ll need to use a capture card if your camera does not have a way to send an output to your computer or the internet. Finally, make sure to check that the encoding software you’re shopping for is compatible with your operating system.
Hardware Encoders
Hardware encoders do the same thing that software encoders do, but it’s an out-of-the-box solution. They don’t need a capture card, and there are no compatibility issues because they run on their own operating system.
Encoders Comparison
It is not possible to determine the absolute best encoder because the right encoder depends on each situation. But this pros-cons list may help you decide which encoder is right for you:
| Pros | Cons | |
|---|---|---|
| Encoding Software |
|
|
| Encoding Hardware |
|
|
That wraps up streaming equipment. Now, let’s quickly cover internet connection requirements that you’ll need for quality broadcasting.
Internet Connection
Finally, you’ll need a reliable network for broadcasting. Here are two general rules when it comes to internet speeds for quality broadcasting:
- Always have an average upload speed of at least 2 Mbps, and
- If you’re streaming high quality video, have twice the upload speed of the broadcast. For example, an HD video streams 3 Mbps, so you’ll need at least 6 Mbps upload speed.
If you’re broadcasting with MyVRSpot’s Broadcaster Application for either iOS or Android, then you’ll know the status of your internet connection depending on the color of the text as shown in the image below. Green is good, yellow is mediocre, and red is poor.

Live broadcasting in schools doesn’t have to be scary or difficult once you know what equipment you need and what features to look for. With the right equipment, your schools will be ready to stream anything! From morning announcements, to board meetings, holiday events, sports and more.
Check out our Streaming Buyer’s Guide, which is a list of recommended streaming equipment from MyVRSpot users. If you don’t see a piece of equipment that you use and love, let us know in the comments!
If you or your district are ready to try Live Streaming, contact us to set up a trial account with MyVRSpot.


